Saturday, December 12, 2009

Black progress bar when playing recordings from FreePBX website(s)

Just wanted to quickly write this tip.

When accessing FreePBX recordings or in any case, playing a QuickTime embedded video via a browser, the indication bar shows all black making it impossible to see the progress bar and what not.

image

This is somehow a bug in Windows 7 and/or Apple Quicktime. I’ve made a support incident on Apple’s website, waiting for a response.

The quick workaround around this is to run your browser in compatibility mode such as Vista SP1, 2..

I personally don’t care, but some customers may just raise an eyebrow. So those who want this “fix” do this below.

How to? Go to your Windows Start button, look for the affected browser/link (must be a link not the exe itself), right click, properties and select compatibility, enable the compatibility by selecting Vista SP1,2…then reload the browser. You should see it now.

image

Cheers and have a good weekend.

Tuesday, December 8, 2009

trunking as a SIP client on asterisk via freepbx

Some of you may purchase a SIP service thus having a SIP extension given to you by your SIP provider. This is not the same as a SIP trunk where an “agreement” is made between two SIP servers. This is a typical SIP client which you configure on a softphone or a hardphone.

If you wish to make Asterisk become the “client” in receiving and making calls from this account you can easily do that with FreePBX and this guide would help you do so.

Firstly, you need the SIP provider account with a minimum user, pass and IP/name of the SIP provider, like what we in Astiostech provide called Astervox.

This account will be used to make and receive calls via an Asterisk and will be then forwarded to an Internal SIP extension. From this extension, you can shoot it out to a queue or whatever you wish to do with it.

Diagram.

image

Let’s say the Astervox (SIP provider) gives us an account like this:

Ext/User: 4000
Pass: 4000abc
Server: voip.astervoxvoiperserver.com

Here’s how to get it working with FreePBX/Asterisk

1) Go to FreePBX, General settings and enable Inbound SIP calls
image

2) Create a new SIP trunk, call it anything you wish, go to the Outgoing Settings (thus becoming the outbound trunk)
 image
host=<yoursipproviderIPorName> [When using name, ensure you can resolve]
username=4000 [the sip account username]
secret=4000abc [the sip account password]
type=peer
qualify=yes
fromuser=4000
fromdomain=myoffice.dyndns.org [this is your Asterisk IP or name or Dyndns]
canreinvite=no
insecure=very
nat=yes

3) For the Inbound (incoming call) part, go to Register String, enter the authentication info again like below and the extension where you wish to shoot the call to.

image [See below for full text]

4000:4000abc:4000@voip.astervoxvoiperserver.com/1001

/1001 is the internal extension that will be dialed when this SIP client 4000 is called (SIP bridging) on the SIP provider. Note, 1001 could also be an Inbound route because 1001 is treated as a DID therefore with an inbound route, you can do more routing and stuff, with it.

4) Save and apply configuration in FreePBX

5) Define Outbound Routes so that you can dial via this Trunk

6) Define Inbound Routes if you like to shoot different CID to different places.

To check if the links/registrations are up, at the command prompt, run:

# asterisk –rx “sip show registry”  [for our inbound - you should see state=registered to your SIP provider]

# asterisk –rx “sip show peers” [for our outbound – you should see status=OK]

Remember! If you are behind a NAT, you must NAT to your Internal Asterisk box UDP/5060 and UDP/10000 to 20000. Otherwise you may get one way audio issues. If required outbound rules also may need to be set and as a minimal the UDP/5060 and the RTP part you should get from your provider, normally with Asterisk its UDP 10000 to 20000.

Done.

Friday, December 4, 2009

Debian software RAID made easy

In this guide, we will setup a mirrored pair of a SATA disk straight from the Debian installer process.

Go through all up to the stage of selecting Partition Disks. Select manual and follow the rest of this guide.

1) Create the initial partition by selecting the disks and saying yes to partition them for both disks.

On both disks

2) Select the first FREE SPACE available

3) Create partition like /boot, /swap and / (root) partitions.

In our case, we will setup 2GB for /boot (enable bootflag), 2GB for /swap and the rest is for / (root). Now, we do not need to mirror /swap so our guide will skip that and our RAID will only monitor and mirror /boot and / (root)

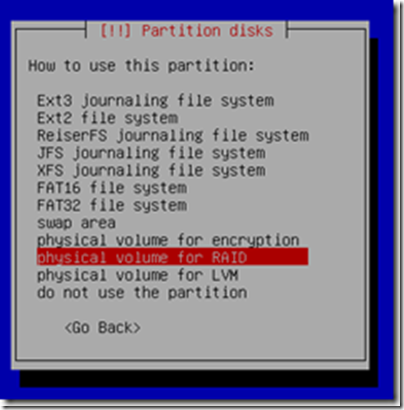
When partitioning, under enter Use as, select physical volume for RAID. See screens below;
clip_image001

4) Select use as.

clip_image002

5) Set the boot flag on for /boot for both disks when creating them. For /swap and / (root) you don’t do that. Now, setup /swap and / (root) for both disks as well. Here, since swap is not RAIDed (when selecting -Use as- for the swap partition, select swap area instead) See below for the entire physical architecture.

/boot – use as physical volume for RAID with boot flag on >> becomes sda1 or sdb2

/swap – use as swap >> becomes sda2 or sdb2

/ – use as physical volume for RAID >> becomes sda3 or sdb3
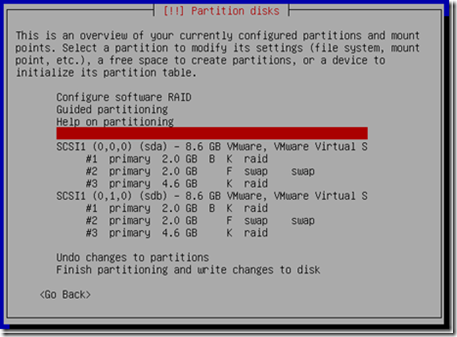
clip_image003

Important: We should have at least a boot, swap and root partition and do this for all other partitions that you want/have.

Enable the RAID virtual volumes

6) Now, select Configure RAID

7) Since we are enabling RAID for 2 partitions, we need to create two Multidisk (MD).
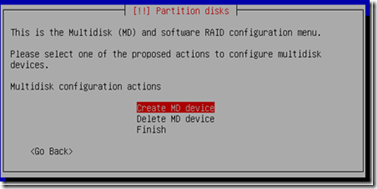
clip_image004

Select Create MD device.

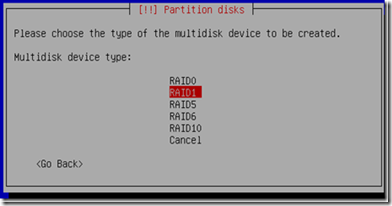
clip_image005

Select RAID1 - Mirror

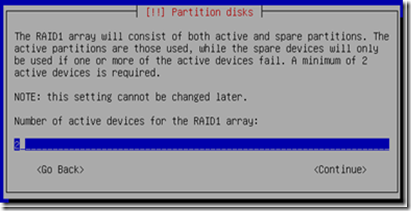
clip_image006

Select accordingly (in mirroring case would naturally be 2), i select 2
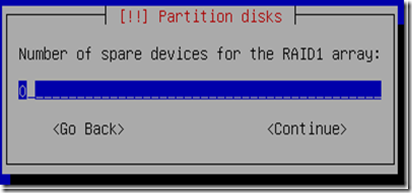
clip_image007

Select spare devices if you have any, i select 0
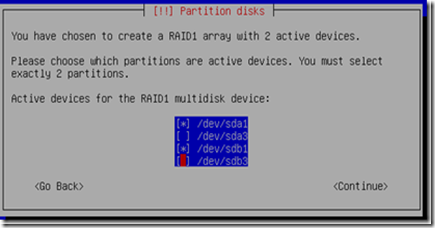
clip_image008

The first MD, md0, we assign it to /boot which are sda1 and sdb1. The second MD, md1, we assign it to /sda3 and sdb3. The above diagram, we are setting up md0, go through creating a new MD, this time, we are left with the rest unassigned partitions.

Configuring the RAID volumes

Once you’ve set it up correctly, you disk layout should look like this;
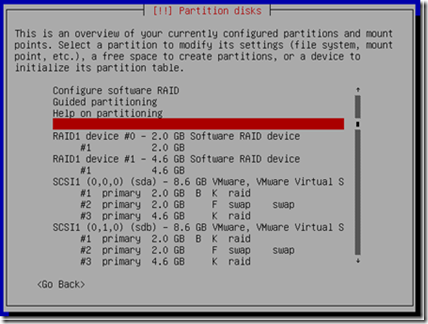
clip_image009

Notice, we have RAID 1 device 0 – which is our /boot and we have RAID 1 device 1 which is our / (root).

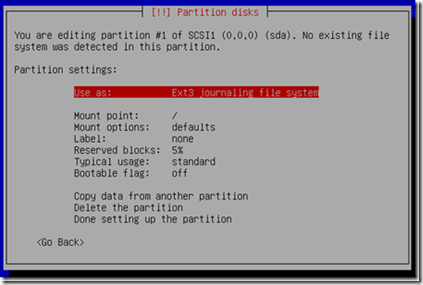
8) Now in RAID device 0, select #1 and set that up with Ext3 and select mount point /boot.
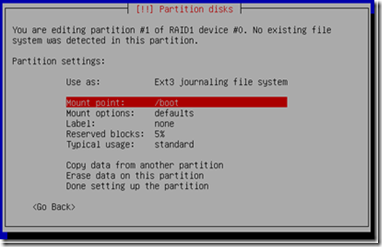
clip_image010

Now, on RAID device 1, select #1 and set that up with Ext3 and select mount point / (root).

9) Eventually, the disk architecture would look like this;
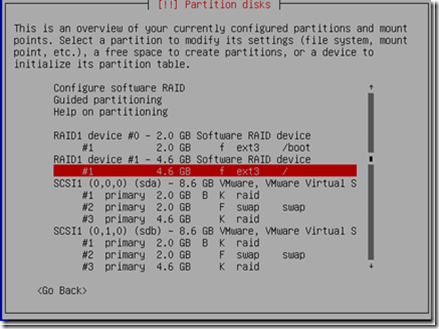
clip_image011

Beside the SCSI 1 and SCSI 2 devices, we now have RAID1 device 0 and device 1 with /boot and / (root) setup.

10) Finally, select Finish….and continue Debian setup till the end, reboot and now you have a RAID 1 configuration.

PS>> The installer might complain about kernel not knowing this and that. Just continue.

After RAID
To check the status of your raid, run

# cat /proc/mdstat

Disk recovery on software RAID
To resync new disks (due to failure whatever), you must do a couple of things. One involves adding the disk to the M0 and M1 volumes and telling grub to install itself in the new disk that you just installed. Here’s how.

Assuming the first disk (sda) failed, and we have replaced and rebooted the server, here’s what all we need to do.

First, we copy the partition structure from sdb (the exiting non failed one) to sda (the new)

# sfdisk -d /dev/sdb | sfdisk --force /dev/sda

Now, we remove any existing raid configs on this new drive (just in case)

# mdadm --zero-superblock /dev/sda1
# mdadm --zero-superblock /dev/sda2
# mdadm --zero-superblock /dev/sda3

[If you get an error, just ignore, meaning you don’t have existing RAID configs in it]

Now, we add back these partition to the RAID MD volumes accordingly

# mdadm -a /dev/md0 /dev/sda1
# mdadm -a /dev/md1 /dev/sda2
# mdadm -a /dev/md2 /dev/sda3

Now, we would like to see the raid resyncing

# cat /proc/mdstat

After that, we must tell grub to enable itself on the newly added disks.

# grub

[The above grub command will end you up in the grub shell, once in this shell, enter the following info]

grub> root (hd0,0)
grub> setup (hd0)
grub> root (hd1,0)
grub> setup (hd1)
grub> quit

This means, i am setting up grub on hd0 and hd1 and so on if you do other types of raid or have more disks etc.

That should get the recovered disks back to speed. Before rebooting, ensure disk sync is completed, keep running

# cat /proc/mdstat

[===========>........] 

If the above is happening, it’s still syncing. Don’t reboot yet until these are done.

Good luck.

Monday, November 16, 2009

choice: best SIP softphone for Windows

Ever used soft phones that limit you to many many functions until you “unlock” them by purchasing a full version? Well, we all did and we too frown at those. Softphones such as Zoiper and X-Lite are amongst the famous ones but the lack functionalities on the free edition such as call conferencing, forwarding, sip TCP, sip TLS etc.
Well, after looking through *almost* all the soft phones found in this article http://www.venturevoip.com/news.php?rssid=2188, i found one that i would rate almost 9/10 for being FREE + its functionality.
Here’s Phonerlite, winner of the list of softphones (without IM, Video),

image
Yes, yes, it doesn’t have a fancy skin or 3D images here and there but this piece of software does all what those other free ones want you to pay money for. It lets you do conferencing, forwarding, sipTCP, sipTLS, IPv6, detailed log, phonebook and yes, STATISTICS to see how good/bad the current connection is in real time. Wow, now that’s just awesome.
Those in hurry to get it, here’s link for downloads http://www.phonerlite.de/download_en.htm
There’s a BETA which you can play around with and test. You can also run it straight off a portable device without any installs, with this file  http://www.phoner.de/PhonerLite.paf.exe
Installation is pretty brain dead, straight forward. They even have a Wizard to setup your account. One thing it lacks is an automatic start but that isn’t much a hassle to do in Windows, just make a shortcut of the executable and drag it into the “Startup” menu in your START menus.
If you do try it and wonder how to conference its easy. When a call comes in, just hit the conference button, dial another extension or as many extensions as you wish and everyone’s conferencing.
image
To forward, if a call comes, dial another extension, drag and drop the current call to the intended recipient. Careful not to drag drop many calls, this software is not intended to replace a receptionist system such as FOP or a receptionist board.

Sunday, November 8, 2009

Nagios Receive SNMP Traps (with SNMPTT)

SNMPTT (SNMP Trap Translator) interacts with snmptrapd to receive traps and process them into Nagios by matching the IP of the trapping host to a host in Nagios and changing a passive check in Nagios to alert someone.
In the below guide:
[APC-UPS] –>send traps to–> [SNMPTRAPD –> SNMPTT –> NAGIOS]
clip_image001
Here’s a simple guide, adapted and made much more cut and dry (and a little more simpler) from the guide found here.
We use Nagios 3.20, SNMPTT 1.3beta2, Debian Lenny (5)
As usual, your feedback will mean a lot to us. Thanks!
Sanjay.
Download some pre-reqs
=======================

Main component is SNMP (and some snmp tools) so do this at the CLI
apt-get install snmp snmpd libsnmp-dev
SNMPTT setup starts
===================

1) apt-get install unzip

2) cd /usr/src
3) wget http://search.cpan.org/CPAN/authors/id/C/CH/CHORNY/Text-ParseWords-3.27.zip
4) unzip Text-ParseWords-3.27.zip
5) cd Text-ParseWords-3.27
6) perl Makefile.PL
7) make test
8) make install
9) perl -MCPAN -e shell
At the Perl CLI
install YAML
install Getopt::Long
install Config::IniFiles
install Time::HiRes
install Sys::Hostname
install Text::Balanced
install Sys::Syslog
install DBI
install DBD::mysql
install Crypt::DES
install Digest::MD5
install Digest::SHA1
install Digest::HMAC
install Net::SNMP

Download, install and configure snmptt (the magician)
=====================================================

10) cd /usr/src
11) wget http://downloads.sourceforge.net/project/snmptt/snmptt/snmptt_1.3beta2/snmptt_1.3beta2.tgz?use_mirror=nchc
12) tar -zxvf snmptt_1.3beta2.tgz
13) cd snmptt_1.3beta2
14) cp snmptthandler /usr/sbin
15) cp snmptt /usr/sbin
16) cp snmpttconvert /usr/sbin
17) cp snmpttconvertmib /usr/sbin
Configure snmptrapd to not log but send them to snmptt
======================================================
18) nano /etc/snmp/snmptrapd.conf

19) Enter the following lines in there
traphandle default /usr/sbin/snmptt
disableAuthorization yes
donotlogtraps yes

Configure and enable the snmptrapd as a service
===============================================
20a) nano /etc/default/snmpd and /etc/init.d/snmpd

TRAPDRUN=yes
TRAPDOPTS='-On -Lsd -p /var/run/snmptrapd.pid'

20b) /etc/init.d/snmpd start
21) netstat -an | grep "162"
>> Should see output

22) cd usr/src/snmptt_1.3beta2
23) cp snmptt.ini /etc/snmp
24) nano /etc/snmp/snmptt.ini, look for and change the following settings
net_snmp_perl_enable = 1
dns_enable=1

25) cd /usr/src/nagios-plugins-1.4.13/
26) mkdir /usr/local/nagios/libexec/eventhandlers
27) cd /usr/local/nagios/libexec/eventhandlers
28) wget
29) chmod +x submit_check_result
TESTING - Create sample to test
===============================
30) cd /usr/share/snmp/mibs
31) wget

32) snmpttconvertmib --in=PowerNet-MIB.mib --out=/etc/snmp/snmptt.conf.apcpower --exec='/usr/local/nagios/libexec/eventhandlers/submit_check_result $r TRAP 1'
Here, the line above, you can change TRAP to any name as long as it matches the Service name in Nagios and 1 is the alert type, 0=OK, 1=WARNING, 2=CRITICAL etc..
33) nano /etc/snmp/snmptt.ini
add the /etc/snmp/snmptt.conf.cpqpower in [TrapFiles], comment out snmptt.conf
Example: Here we added /etc/snmp/snmptt.conf.apcpower based on the snmpttconvertmib outputfile like above

[TrapFiles]
snmptt_conf_files = <<END
/etc/snmp/snmptt.conf.apcpower
END

Enable log rotation
=======================
34) nano /etc/logrotate.conf
This is for log rotation. Add the following line at the end

/var/log/snmp/snmptt.log /var/log/snmp/snmpttunknown.log
{
missingok
}

35) mkdir /var/log/snmptt
36) touch /var/log/snmptt/snmptt.log
37) touch /var/log/snmptt/snmpttunknown.log
Configuring hosts file
=======================
Traps send IP not name, so we must configure /etc/hosts to add the name and ip of the device sending traps to us

38) nano /etc/hosts
Add the following as sample
192.168.1.11 sanjaypc
>> Important! This name will be the same as your hosts.cfg file in nagios that will receive the traps
Send a sample trap: - Load the same MIBs into a program like ireasoning and send a trap to your nagios IP
=======================================================

39) tail -f /var/log/snmptt/snmptt.log
Sun Nov 8 09:09:11 2009 .1.3.6.1.4.1.318.0.5 WARNING "Status Events" 192.168.157.1 - APC UPS: On battery: The UPS has switched to battery backup power.

40) tail -f /var/log/messages --- Output (after configuring Nagios settings below - or at least have a host/service defined that matches sanjaypc and TRAP)
Nov 8 09:09:20 server1 nagios: PASSIVE SERVICE CHECK: sanjaypc;TRAP;1;APC UPS: On battery: The UPS has switched to battery backup power.

Configuring Nagios- Sample definitions
=====================================

trap-service template
=====================================

define service{
name generic-service
register 0
check_period 24x7
max_check_attempts 3
normal_check_interval 15
retry_check_interval 5
active_checks_enabled 1
passive_checks_enabled 0
parallelize_check 1
obsess_over_service 0
check_freshness 0
event_handler_enabled 0
flap_detection_enabled 0
process_perf_data 1
retain_status_information 1
retain_nonstatus_information 1
notification_interval 60
notification_period 24x7
notification_options w,u,c,r
notifications_enabled 1
}

define service{
name trap-service
use generic-service
register 0
service_description TRAP
is_volatile 1
check_command check-host-alive
max_check_attempts 1
normal_check_interval 1
retry_check_interval 1
passive_checks_enabled 1
check_period none
notification_interval 0
contact_groups admins
}

Create service to host - NOTE: Hostname must match to /etc/hosts definition we created earlier
==================================================

define service{
host_name sanjaypc
use trap-service
contact_groups admins
}

41) Restart nagios
42) Send a trap again and check Nagios website, it should turn yellow [WARNING] and a notificaiton sent out

Nagios Send SNMP Traps

We hope this small guide can help you quickly setup your SNMP traps out to a remote management host.
First thing do ensure that your Nagios box has the snmptrap binary and perhaps all other associated SNMP binaries installed. If you haven’t a good start would be to use the following lines:
This guide was made using Nagios 3.2.0, Debian 5
Debians..
apt-get install snmp snmpd libsnmp-dev
Redhats..
yum install net-snmp net-snmp-utils net-snmp-devel –y
In Nagios, we setup to have SNMP traps to send out to a HP OpenView box in our customer’s corporate network. These traps are sent as Event Handlers in Nagios. You may try doing them as normal notifications (i guess, haven’t tested).
So, each time there’s a state change (e.g. from OK to Warning), you will get, beside the standard notifications, an event that triggers a snmp trap to a remote management host.
To make things simple, we use existing config definitions such as the original commands.cfg and the linux-services.cfg. The following guide attempt to send a trap when there’s more than 2 or 3 users logging onto the nagios (localhost) box.
First, edit the commands.cfg file and add the following lines. I will explain what these lines mean.
define command{
   command_name send_snmptrap
   command_line /usr/bin/snmptrap -v 2c -c public 192.168.2.22 '' NAGIOS-NOTIFY-MIB::nSvcEvent nSvcHostname s "$HOSTNAME$" nSvcDesc s "$SERVICEDESC$" nSvcStateID i $SERVICESTATEID$ nSvcOutput s "$SERVICEOUTPUT$"
}
Simply copy paste everything and it should actually be single lines something like below;
image
The command name can be anything you wish, just as long it’s mentioned correctly in the _x_services.cfg files.
/usr/bin/snmptrap –v 2c –c public 192.168.2.22…
This is quite straightforward, here, we attempt to send SNMPv2 with the community string of public to the remote server 192.168.2.22.
…'' NAGIOS-NOTIFY-MIB::nSvcEvent nSvcHostname s "$HOSTNAME$" nSvcDesc s "$SERVICEDESC$" nSvcStateID i $SERVICESTATEID$ nSvcOutput s "$SERVICEOUTPUT$"
This part above firstly, feeds the Nagios MIBs so that we can use easy readable words such as NSvcDesc instead of OID numbers. It would be a good idea to give the Nagios MIBs to the 3rd party remote monitoring host as well.
[EDIT: UPDATE: – The Nagios MIB has a wrong definition or its actually meant for V2 of Nagios. Use this MIB which should work for V3]
The next few fields are completely up to you and what you wish Nagios to output to the trap receiver. In my case, $HOSTNAME$ – The monitored host, $SERVICEDESC$ – service description, $SERVICESTATEID$ – the Nagios state id like 0 for OK, 1 – for warning etc…and $SERVICEOUTPUT$ – The additional info field from the plug-in is sufficient. You may add more if you like where you deem necessary.
The Macros ($name$) are defined well in Nagios documentation. The n(typeID) are found in the MIB files, so do match them well. Some fields have been changed from Integer (i) to octect string (s) and this may cause your traps to fail. Whatever the case is, you can simulate the trap at the CLI such as
snmptrap -v 2c -c public 192.168.2.22 '' NAGIOS-NOTIFY-MIB::nSvcEvent nSvcStateID s “$SERVICESTATEID$”.
This will give errors as nSvcStateID in the MIB is expecting an Integer value, so changing to
nSvcStateID i $SERVICESTATEID$
Will then work. Etc..
Now, the command to execute and send traps out is ready. Now we tell which service/host is to execute this command in a state change (triggering the event handler).
Here’s a sample of my linux-services.cfg
define service{
  use                         debian5-linuxservice
  host_name                   Nagios-Server
  service_description         Current Users
  event_handler               send_snmptrap
  event_handler_enabled       1
  check_command               check_local_users!2!3
  }
NOTE: Check local users thresholds are normally much higher but for testing, i just made it warn at 2 users and critical at 3.
The only two parts i added from the normal service definition are;
event_handler            send_snmptrap
event_handler_enabled    1

That’s all is needed for hosts or services to send traps out with the configured output as above when a state change happens.
send_snmptrap is the logical name i created for that command in commands.cfg. Well, that’s about it. Simple right? Now, just restart your nagios to enable the above configs.
/etc/init.d/nagios restart
And test the traps by sending a passive check in Nagios WEB UI to for example, Warning or Critical.
image
Also, if you would like to test receiving traps, i can recommend you the free iReasoning SNMP toolset. There’s a paid one if you like the rich features of this tool but the free one has limited functions.
Now, for iReasoning, launch the MIB Browser tool. Do load the Nagios MIB to make things much prettier. File >> Load MIBs and select Nagios-Notify-MIB. Now, click on Tools >> Trap Receiver.
In the remote management host value (in my case was 192.168.2.22) enter the IP where iReasoning is running. Ensure your windows firewall enables incoming port UDP 162 for snmptraps if you enable WF.
Trigger something and see it work. See sample from iReasoning below.
NOTE: Whenever you change something in the config files, remember to restart Nagios.
image
image
Please do comment and give further suggestions.

Tuesday, October 13, 2009

Did someone ask you to update certificates? Well Don’t!


If you get a mail from just about anyone requesting you to update certificates on your computer. D.O.N.T.
The mail you get may look like this:

On October 16, 2009 server upgrade will take place. Due to this the system may be offline for approximately half an hour.
The changes will concern security, reliability and performance of mail service and the system as a whole.
For compatibility of your browsers and mail clients with upgraded server software you should run SSl certificates update procedure.
This procedure is quite simple. All you have to do is just to click the link provided, to save the patch file and then to run it from your computer location. That's all.
http://evil-link/evil-file
Thank you in advance for your attention to this matter and sorry for possible inconveniences.
These are new breed of social engineering that attempts to fool someone into updating their certificates which in turn adds a root certificate of the attacker therefore validating all his websites, software and whatever that uses certificates as VALID.
This would then make it easier for someone to convince you that www.maybank2u.com.my is actually their own webserver as there won’t be any prompts saying the certificate is invalid.
In Windows, only use Windows Update to update your root certificates. This is done securely by Microsoft and MS is probably the folks you can trust in this case.
If you receive this and you think it could be from an internal IT team, it’s probably not the case. Do get facts and ask your IT Department.

Saturday, September 26, 2009

Office 2010 protects documents from untrusted sources like the internet

Typically, when you open something through MSWord, Excel through direct download, all components within that document such as internet links, scripts or procedures may be enabled (depending on your security levels).

One feature i really like in Office 2010 is the fact that the software “knows” and treat whatever office documents downloaded via the internet and mark them as “public/unsafe”

Documents opened in Protected View (as its called) prevents malicious codes from being executed through sandboxing the application or isolating its process.

When launching a document in this mode, the task manager shows 2 processes of winword.exe (Microsoft word executable binary). Assuming that one of it is the original application running in normal mode but the one with the smaller memory footprint is probably the one being sandboxed (reduced functionality).

image

Once you’ve accepted to edit, see the ENABLE EDITING button on top right, it will execute the process in normal view and the so called sandboxed version is no longer in memory.

image

Protected view prevents application attacks that attempt to inject and run code by enabling features such as ASLR, DEP and /GH.

I like this. Helps users be automatically protected, view the content first (incase curiosity gets the better of you) and then decide to “enable” the document in normal view.

Good stuff!

Have a wonderful weekend.

Microsoft Internet Lottery Scam

These guys get smarter. To avoid being tagged spam, they send the main content body through word document. So it sailed pass the Hotmail antispam service and right into my inbox. Anyway, just share with you how ridiculously funny this is.

To top that, it comes from a yahoo address: evansokoli8@yahoo.com 

MICROSOFT INTERNET LOTTERY AWARD 2009

MORLEY HOUSE, 26-30 HOLBORN VIADUCTS,

LONDON EC1A 2BP.U.K.

Dear Email Owner,

We are pleased to inform you that you have won a prize money of GBP800,000.00 British Pounds (Eight Hundred Thousand British Pounds) Only for the email users this 2009 Prize promotion which is organized by MICROSOFT, We Collects all the email addresses of people worldwide, that are active online this 2009, among the millions that subscribed to MICROSOFT, HOTMAIL, YAHOO, GMAIL and few from other e-mail providers, 12 people are selected monthly to benefit from this promotion and you are one of the Selected Winners this month of SEPTEMBER 2009.

Your email address has therefore been approved to claim a total sum of (GBP800,000.00 BRITISH POUNDS) in cash.

FILE NUMBER: MIC/903/KPC/0108308/09.

1. Your Full Names:

2. Your Country:

3. Telephone Number:

4. Occupation:

5. Age:

To file for your claim, you are advised to contact our appointed paying bank below without any further delay, because your payment file has been forwarded to them for urgent payment of your winning prize, contact MR. STEPHEN HESTER Below as soon as you receive this massage and remember to forward him the Above File Number And Information’s which will help him to know that you are the rightful beneficiary, then he will instruction you on what to do next to receive your fund.

PAYMENT BANK CONTACT INFORMATION:

BANK NAME: ROYAL BANK OF SCOTLAND LONDON-UK

CONTACT PERSON: MR. STEPHEN HESTER

FOREIGN REMITTANCE DEPARTMENT

Tel: +44-703-174-7509

Fax: +44-870-471-8189

Tel/Fax: +44- 844-774-4940

Contact Email: stephenhester@mycin.net

WARNING: Any Prize that is not claim within 29 working days from the day you where notified will turn void and invalid, and You are advised to keep your winning information confidential until your claims are processed and your fund remitted to your bank account. This is part of our precautionary measure to avoid double claiming and unwarranted abuse of this program by some unscrupulous elements.

For more clarifications, please contact MR. JOHN WILLIAMS through his contact email address: johnwilliams63@live.co.uk

Congratulations once again,

Mr. Evans Okoli.

Head Customer care Service

Microsoft Promotion Team

Our special thanks and gratitude to Chairman CEO MICROSOFT Bill Gates and his associates we wish you the best of luck. Thank you for being part of our promotional award program and commemorative Anniversary.

© Copyright 2009 Microsoft Lottery promotion All Right Reserve"

Sunday, September 13, 2009

Forefront TMG NIS protects against SMB2.0 attacks


Microsoft has added protection against exploits targeting a vulnerability in the Server Message Block (SMB) implementation in mere hours. However, only customers running the Forefront TMG Network Inspection System can breathe easy. The Redmond-based company informed that the protection against the Critical zero-day vulnerability in SMB 2.0 was the first 0-Day signature release ever introduced to Forefront TMG NIS, according to Avi Ben-Menahem, Group Manager, Network Inspection System.
“In a matter of hours we completed root-cause analysis, signature development, testing and publishing of a new signature snapshot. During this process, which is driven by the Microsoft Malware Protection Center (MMPC), the team was able to demonstrate the agility of the core NIS technology and exercise the technologies and tools built over time to release a signature for theVuln:Win/SMB2.Srv2.DoS!2009-3103 vulnerability in just a few hours,” Ben-Menahem revealed.
Want to try it out? Download here