[img src http://www.getisymphony.com/]
Some introduction
About iSymphony
For years, i’ve been asked by Asterisk users in many corporations to have a web management page for our much loved Asterisk IPPBX, there has been near complete products out there and some does one thing and doesn’t do others. I’ve been following iSymphony for some time now but before V3, it didn’t quite interest me simply because of the need to install a specific client on user’s desktop. But now, its pure Web which is simply awesome. If you would like to get your Asterisk equipped with this cool tool, let us know, and we will do the install and consultancy/setup for you. We can be reached via www.astiostech.com!
The benefits of iSymphony (most screens and text take of http://www.getisymphony.com/)
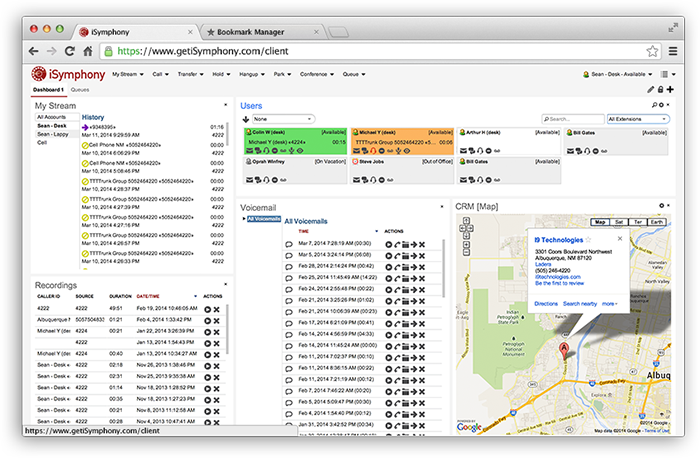
iSymphony is the best web-based call management solution for your Asterisk PBX. Thousands of organizations choose iSymphony to organize people and the flow of information from your phone system. Be more productive by communicating on a realtime platform with everyone in your organization.
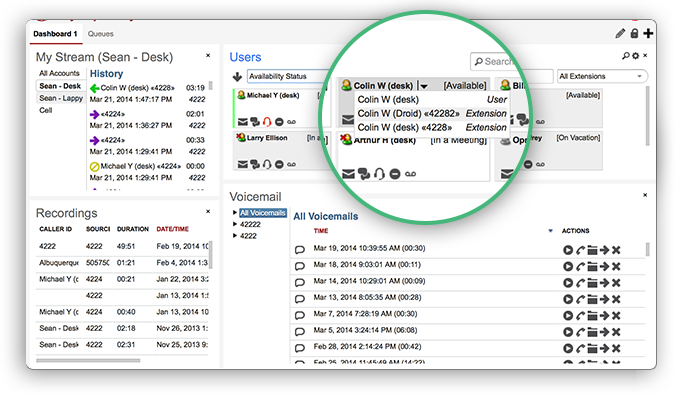
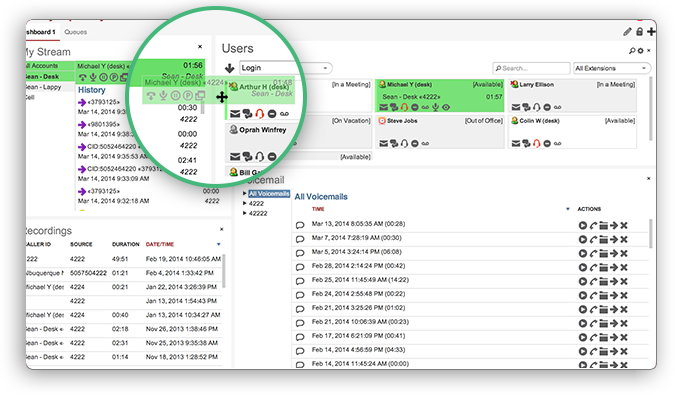
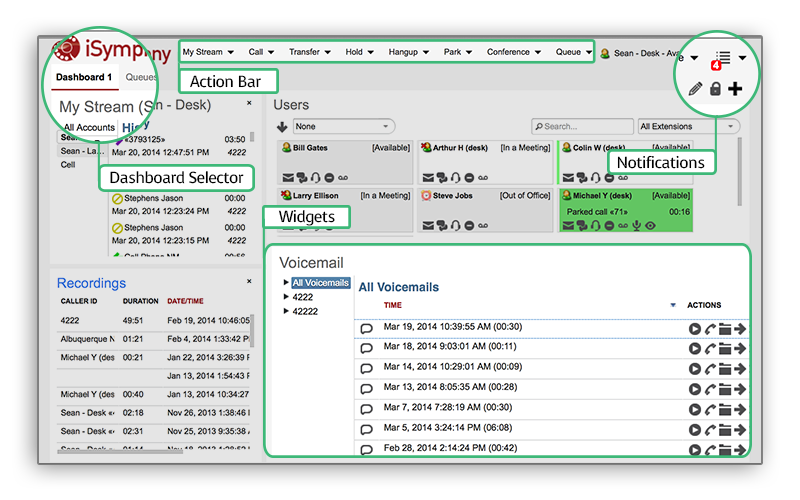
To summarise, iSymphony is:
- A centralized directory which enables click to call without touching your actual phone. It reads user info straight off FreePBX! so don’t need to create twice
- UI to check your voicemails, listen to recordings etc straight off your browser
- UI to get personalised call logs and see user’s statuses such as busy/free
- Chat with users within the organization
- Park calls, jump into conferences, transfer and manage calls to your extension or to a group of extensions you manage (i.e. a real boss secretary module)
- Integrate into CRMs for popups etc…
- Drag and drop layout and its also fully customizable to meet each user’s preferences
- See notifications through the webUI and react to them!
- Manage everything via its own website or via FreePBX’s module
Everyone should try it, therefore, i am writing this simple guide for initial users who just wanna try it out. Here’s what is covered in this guide
Now, lets install!
Pre-requisite using this guide, of course, it supports more platforms and versions (see here)
- Debian 6 or higher
- Asterisk with FreePBX 2.11 or higher
- Sun JRE
Firstly, you must have a working Asterisk+FreePBX. If you don’t get my image from here, simple to use and works straight out.
From your CLI, copy/paste and execute the following in #, change where you know stuff, if you don’t just follow the guide!
- Install Sun JRE 7 (thanks to http://www.webupd8.org/ for making it so easy to install JRE)
#echo "deb http://ppa.launchpad.net/webupd8team/java/ubuntu trusty main" | tee /etc/apt/sources.list.d/webupd8team-java.list
#echo "deb-src http://ppa.launchpad.net/webupd8team/java/ubuntu trusty main" | tee -a /etc/apt/sources.list.d/webupd8team-java.list
#apt-key adv --keyserver keyserver.ubuntu.com --recv-keys EEA14886
#apt-get update
#apt-get install oracle-java7-installer
NOTE: If you get timeout errors or etc, please retry that last command again until you see “Oracle JDK 7 installed” - Get iSymphony, install and start the daemon
#cd /usr/src
#wget http://www.getisymphony.com/files/builds/isymphony/3.0.1_5238/iSymphonyServerV3-3.0.1.5238.tar.gz
#tar -zxvf iSymphonyServerV3-3.0.1.5238.tar.gz
#cd iSymphonyServerV3-3.0.1.5238
#chmod +x install.sh
#./install.sh [Note, when asked for the location of SUN JRE enter /usr/lib/jvm/java-7-oracle leave default path for install location of iSymphony, i.e. /opt/isymphony3/server]
#/opt/isymphony3/server/startup.sh [this will start the iSymphony server instance]
To check if its running, you should see ports tcp 58080 listening
#netstat -an | grep 58080 - Setup AMI (manager)
If you have the module, use the FreePBX’s Asterisk API module, otherwise, simply edit
#nano /etc/asterisk/manager_custom.conf
Paste something like this below
[cxpanel]
secret = cxpSecure123
deny = 0.0.0.0/0.0.0.0
permit=127.0.0.1/255.255.255.0
read = all
write = all
Now, reload manager like below
#asterisk –rx “manager reload”
Note: If you get “Privilege escalation protection disabled!” the setting “live_dangerously” is turned on in asterisk.conf. If this is the case, simply run that “manager reload” command inside asterisk shell (asterisk –r)
Now, by using the admin page of iSymphony (e.g. http://192.168.2.55:58080/administrator/admin where 192.168.2.55 is your own IP address), login using the FreePBX’s admin user and password (as default used by iSymphony as the admin user). Navigate to Phone System, click on PBX Connection, “edit” the localhost connection setting. In there, modify the username/password as set above. In the example above the username is cxpanel and the password is cxpSecure123. Click save. This will allow iSymphony to originate and control calls using the AMI protocol from Asterisk.
OPTIONAL: Autostart at boot
To enable it to autostart, edit the file /opt/isymphony3/server/config-vars.sh
Change the JAVA_HOME location to /usr/lib/jvm/java-7-oracle
#nano /etc/init.d/isymphony.sh [then paste the content below ]
#startup script for iSymphony for Debian installations
#!/bin/sh
### BEGIN INIT INFO
# Provides: isymphony
# Required-Start: $all
# Required-Stop: $local_fs $syslog $remote_fs
# Default-Start: 2 3 4 5
# Default-Stop: 0 1 6
# Short-Description: Start isymphony at boot time
# Description: Starts isymphony services at bootime
### END INIT INFO
#
case "$1" in
'start')
/opt/isymphony3/server/startup.sh
RETVAL=0
;;'stop')
/opt/isymphony3/server/shutdown.sh
RETVAL=0
;;*) echo "Usage: $0 { start | stop }"
RETVAL=1
;;
esac
exit $RETVAL
-
#chmod +x /etc/init.d/isymphony.sh
#update-rc.d isymphony.sh defaults - Install and enable the FreePBX iSymphony module
Download the FreePBX module here [Download the “FreePBX Module” tar.gz file]
Now, head on to FreePBX, click on Admin | Module Admin and click on Upload Modules. Then upload the FreePBX module (should look something like cxpanel-3.0.5238.tar.gz). Choose file and click “Upload”
Then, click on Manage Local Modules, and ensure that iSymphony V3 is selected and set to install!
Click on Process, Confirm and then “Apply Config” - Be sure if you have iptables or any types of firewalls behind your box (or inside it) it allows TCP 58080!
- Now, see the notes below
NOTES:
- The default admin page can be accessed via http://192.168.2.55:58080/administrator/admin where 192.168.2.55 is your own IP address
Here’s my screenshot of the admin page:
- The default admin access is admin/<your freepbx admin password>, mine was @steriskRocks1, per my Asterisk image
- Users, are created in FreePBX 2.11 (be sure to update to latest freepbx versions online) where now it combines/manages users under “User Management” and the usual extension/users module, that will have an iSymphony account tied to it, as shown below. It is optional to enable or not.
This below is my user 10000 i created: - Now, that user 10000 has access to iSymphony, via http://192.168.2.55:58080/client/client where 192.168.2.55 is your own IP Address
- Simply login and you can see the wonderful features/interface as below
- Enjoy and do let me know if you need help or let us help you install in your company



1 comment:
Nice ,Article Sanjay...
Just for query, is iSymphony client webrtc capable and can make/accept call from client web interface?
Thanks,
Sourav
Post a Comment